Tuesday, May 21, 2013
10 Windows 7 Tips and Tricks
10 Windows 7 Tips and Tricks
In this tutorial, I`ll be listing 10 Windows 7 Tips and Tricks with detailed step-by-step process to achieve these tricks.
Windows 7 is really different from the other previous versions of Windows, especially Windows XP and 98. This difference has started since Windows Vista. Well, this series of tutorials that I will post on this blog will help you understand Windows 7 better, be more familiar with it, and use the amazing new features the new Windows offers.
In this tutorial, I will show you 10 features of Windows 7 so that you can use the Windows better.
This is the list:-
Tips and Tricks #1: How to access hidden regional themes and wallpapers in Windows 7
Tips and Tricks #2: How to obtain a free power efficiency report for your laptop from Windows 7
Tips and Tricks #3: How to customize the shutdown button on Windows 7
Tips and Tricks #4: How to select multiple files with check boxes in Windows 7
Tips and Tricks #5: How to protect your privacy in Windows Explorer Search
Tips and Tricks #6: How to re-insert the quick launch bar in Windows 7
Tips and Tricks #7: How to show the Control Panel menus on Start Menu in Windows 7
Tips and Tricks #8: How to access the Command Prompt from any folder
Tips and Tricks #9: How to display access to Videos on the Start Menu
Tips and Tricks #10: How to search the internet from the Start menu
(You can open the images on new tabs to view it at its original size if you cannot see them clearly here)
Windows 7 Tips and Tricks #1
How to access hidden regional themes and wallpapers in Windows 7
As default, Windows 7 comes with its logo as the background of your desktop. It’s the blue wallpaper with the Windows 7 logo in the middle. Users are also provided with some other wallpapers, which are related to the region chosen when installing Windows 7.
If you right-click on your desktop, and choose personalize, below the actual theme (background wallpaper) is a list of wallpapers (under the Aero Themes), and you will see a set of wallpapers under the name of the region you selected during installation. For me, it`s United States. The wallpapers there are famous spots in the US.

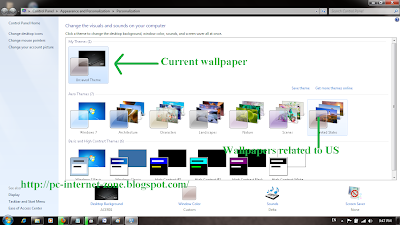
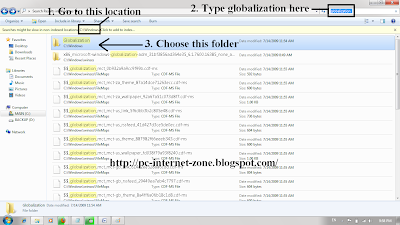
To access the other hidden regional themes and wallpapers, you need to go to the hard drive where Windows 7 is installed, and go to the Windows folder. E.g. C:/Windows. The folder that we need is normally hidden by default, so, at the search string at the top, type globalization and select the Globalization folder as in the screenshot.
Then, in the Globalization folder, type mct in the search string. A list of folders will be displayed, with the names of the regions available.
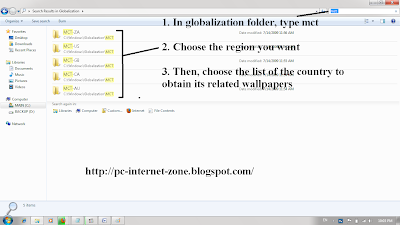
You can choose the regions you want. In the folder you have chosen, choose the name of the country. For example, if you chose Canada, you would have chosen the MCT-CA folder first, then the Canada folder in it. There, you will have a list of wallpapers related to Canada. You can right-click on one of them and choose Set as desktop background.
Now, if you Right-click on desktop, choose Personalize, and choose Desktop Background (at the bottom), you will see a list of wallpapers related to the region you chose at the mct step.
Well, that`s it. You can now access these hidden wallpapers at any time now.
Windows 7 Tips and Tricks #2
How to obtain a free power efficiency report for your laptop from Windows 7
This second tip and trick will allow you to obtain a free power efficiency report about your laptop. This is a great feature available in Windows 7.
The battery is one of the most important hardware of a laptop. Windows 7 will give users a report on how to make the battery life go longer by analyzing your activities and how you use the laptop.
However, this feature does not have a direct access. So, you will need to follow these steps to obtain it. Of course, you need to be on a laptop. You may try it on your desktop computer though, but it will not be of any use.
First, you need to click on the Windows 7 logo on the taskbar at the bottom of your desktop. In the Run string, type cmd, and at the top, right-click on cmd.exe and choose Run as administrator. You will be prompted with a window. Choose Yes.

Then, type the following:
powercfg –energy – output [Folder where you want the output][name of report].html
You can change the [Folder where you want the output] with the name of the folder you would like the report to be output, and [name of report] with the name you wish to give to the report. Check it in the screenshot.
Note:-
- The folder that you specify in the code will appear in C:. You should create the folder before using this method, or the file will not be stored in the folder (the folder itself will not be created), but will go in the temporary files. The folder should not be composed of more than one word, or it will not work.
- As for the file name, you cannot use separate words. Use only a single word; there should not be a space between words.

This is how the report looks. It is color-coded, so you won`t have much problem to distinguish between the information. The information includes data about your operating system, errors, warnings and additional recommendations on how to deal with the battery of your laptop to make it last longer.
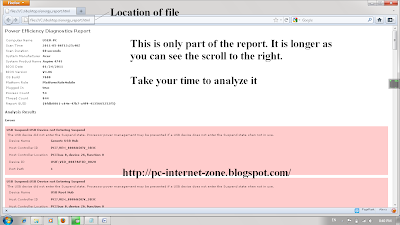
This ends the second Windows 7 tip and trick. Take your time to analyze the report and change your methods accordingly.
And if you are having problems, you ask for help in the comment box. I`ll try to help as soon as possible.
Windows 7 Tips and Tricks #3
How to customize the shutdown button on Windows 7
This next tip will show you how to change the shutdown button on Windows 7. Many a times, when you just want to use the Sleep function of Windows, you have to go through the arrow first. And some times, a mistake can cause you to click the shutdown button while going through the arrow.
So, this is how you can change the function of the shutdown button. Go to the Windows logo at the bottom, and right-click on the Shutdown button and choose Properties. Then, under Start Menu, go the Power button function and choose the option you wish the button to perform.
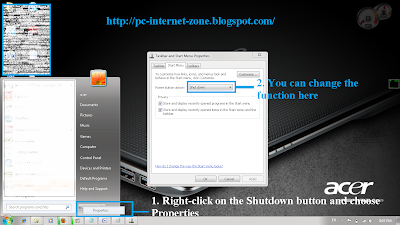
Click Apply and OK. Now when you check the power button again, you will see that it is no longer the Shutdown function, but the one you chose. To shutdown the computer, you will need to go through the arrow first, and then shutdown.
This is a small tip in order to customize the shutdown button in Windows 7.
Windows 7 Tips and Tricks #4
How to select multiple files with check boxes in Windows 7
This is another tip and trick on Windows 7. Normally, if you had to select multiple files in a folder, you would hold the Ctrl button and use the click of your mouse to select the files you want.
Well, you can use this method. However, a single slip from the Ctrl button, you will have to start all over again with the selection. In Windows 7, there is another better way to making these selections.
You can make checkboxes appear next to the files, and instead of using the Ctrl button, you only need the tick or untick the check boxes to make the selection.
To do this, open Windows Explorer, go to Organize (at the top, it`s the first option), and choose Folder and Search options. Under the Tab section, scroll down and tick the ‘Use check boxes to select items’. Click Apply.
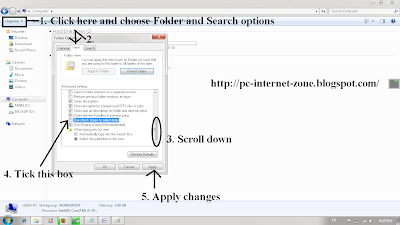
Now, you will see check boxes appearing next to your files. You can use them instead of the Ctrl button. It`s better and safer.
This is how you can use check boxes to select multiple items in Windows 7.
Windows 7 Tips and Tricks #5
How to protect your privacy in Windows Explorer Search
When you click on the search string in Windows Explorer of Windows 7, a list of recent searches appears. In this part, I will show you the tip and trick to prevent this from happening.
If you share a computer with other people, you may want to protect your privacy while searching for your files. This is how you do it.
Click on the Windows Start button, and at the search string, type gpedit.msc and choose it from the list displayed above.
On the new window, go through User Configuration, Administrative Templates, Windows Components and scroll down the list to search for Windows Explorer. On the right side, double-click on Turn off display of recent search entries in Windows Explorer. Then, choose Enable and Apply.

The list of recent searches in Windows Explorer will no longer appear when you make searches now.
That`s the end of the 5th tip and trick which was on how to protect your privacy in Windows Explorer searches in Windows 7.
Windows 7 Tips and Tricks #6
How to re-insert the quick launch bar in Windows 7
The quick launch bar, which was available in the previous versions of Windows is not present by default in Windows 7. However, this is no problem. With this tip and trick, you will be able to re-insert the quick launch bar in Windows 7.
First, you need to right-click on the taskbar at the bottom, go to Toolbars (the first option), and choose new toolbar.
At the folder name, type this exactly as it is
%userprofile%AppDataRoamingMicrosoftInternet ExplorerQuick Launch
and choose select folder.

You should notice the quick launch bar is now present on the taskbar. If you want to change its position, right click on the taskbar and de-select the Lock the taskbar option. You can then use the divider to move the quick launch bar. When you are finished, select the Lock the taskbar option again.
This way, you have added the Quick Launch toolbar. And if you right-click on the taskbar, and go to Toolbars, you will notice the Quick Launch toolbar option is now present.
You can de-select it at any time. However, you should note that if you disable it, you will need to go through the whole process again to add the Quick Launch toolbar again.
This is how you can re-insert the quick launch toolbar of Windows in Windows 7.
Windows 7 Tips and Tricks #7
How to show the Control Panel menus on Start Menu in Windows 7
For those who use the Control Panel many times, you should have notice that it is a pain to access the desired option in the Control Panel. You need to go through many clicks, which are usually time-consuming.
This tip and trick will show you the way to add the Control Panel menus on the Start Menu so that you no longer need to go through the long process.
First, right-click on the Start button, and choose Properties. Under the Start Menu tab, click on Customize. On the Next window, for the Control Panel option, choose Display as a menu and click OK. Click Apply.
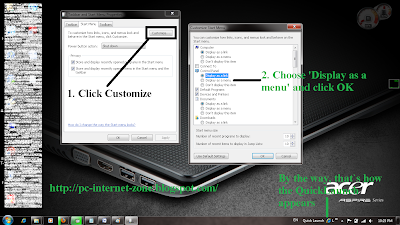
Now, when you check the Control Panel option at the Start Menu, you will see a list of the applications.
This really saves a lot of time. Try it and see. This is how you can show the Control Panel menus at the Start Menu.
Windows 7 Tips and Tricks #8
How to access the Command Prompt from any folder
This tip and trick shows you how to access the Command Prompt from any folder. This is quite a simple trick.
First, as a test, go to any folder and right-click. You will be presented with a list of menus. Now, cancel this (click on a blank spot), and right-click again, but now while holding the Shift key. You will notice the presence of additional menus, among which is ‘Open command window here’. Choose this menu to open the command prompt from that folder.
What is better is that on the command prompt window, you can start at the location of the folder. So, if you needed to insert some commands to a specific folder, you can go to that folder and start the command prompt.
You should, however, note that this does not work with the Libraries folder, as it should be an actual folder in order to do this. The Libraries can be said to be a list of many folders (like some sort of list of shortcuts).
Well, I hope that this tutorial on How to access Command Prompt from any folder helps you.
Windows 7 Tips and Tricks #9
How to display access to Videos on the Start Menu
If you click the start button of Windows 7, you would see direct links to the Documents, Pictures and Music folder, but there is no link to the Videos folder.
If you watch many videos, you would be interested to add a link to the Videos folder so that it saves you a lot of time. This is what I will show you in this 9th tip and trick of Windows 7.
Right-click on the Start button, and select Properties. Under the Start Menu tab, click on Customize. Then, scroll down the list until you reach Videos (it`s normally the last one). Select ‘Display as a link’ (or menu if you wish). Click OK, and finally Apply.
That`s it. If you click on the Start button now, you will see that there is a direct link to the Videos folder. This ends the 9th tip and trick for Windows 7.
Windows 7 Tips and Tricks #10
How to search the internet from the Start menu
This is the 10th and last tip and trick for this tutorial. This last tip will show you how you can search the internet from the search string at the Start menu.
This can prove very useful if you want to make a quick internet search and your browser is not open. Also, even if your browser is opened, you can search the internet without needing to go to the internet browser first.
Press on the Start button, and at the search string, type gpedit.msc (just like for the 5th tip and trick) and choose it from the list at the top. Double click to open. Now, on the new window, navigate through User Configuration, Administrative Template, and choose Start Menu and Taskbar. On the right side, double click on ‘Add Search Internet link to Start Menu’ (it`s normally the first one) and choose Enable, Apply and OK.
Now, go to Start Menu, and type anything in the search string. You will see an option above the string that tells you to search the Internet, and this is with the default browser on your system.
Well, this ends our 10th and last tip and trick for this tutorial. This tip is pretty useful.
That`s it for the 10 tips and tricks for Windows 7. I hope this has helped you. If you need any help on any of these, just ask and I`ll help if I can.
Note that this is only the first tutorial on Windows 7. More will come soon. This is to help you understand and maximize your computer use with Windows 7. It`s really a good Windows and I`ll prove it with more of these awesome tips and tricks.
Be sure to comment and share this link with other people so that they too can use Windows 7 to the max. (I know it`s a bit long, but I think this is better than 10 different posts)